
Draping to Find the Right Fullness

The finished product
On this snowy and wintry day, I got to thinking about a sunny and summery dress I made for a client last year. I’m excited to share with you some of the twists and turns I encountered in my journey of making this custom garment.
Making custom clothing is a fascinating process for me. To begin, I must understand what the client wants, and sometimes this involves helping my client figure out what that is. Then, I have to bring the garment into being: from pattern development and fit, to “engineering” and construction.
It’s really important to me that I create a garment that’s flattering and comfortable for my client. Whether I would like to wear the garment is irrelevant to me. But I want my client to love wearing the garment or ensemble.
I had developed the pattern for this dress several years ago, copying a dress my client had purchased. She loves the fullness and funkiness – it thoroughly reflects her personality – and she has enjoyed wearing the first two versions I made. For those, we’d used opaque fabrics, and I was excited about doing something a bit different: using a chiffon print for the over-dress component of the garment.

The pattern slashed and spread, with drafting paper added into the gaps.
Playing with the exquisite chiffon in our hands was mesmerizing. It was especially lovely when there was more volume or fullness. So rather than having the over-dress lay flat on top of the under-dress fabric as we’d done before, we decided that I should change the over-dress pattern so there was extra fullness.
I thought: Easy-peasy, all I have to do is slash and spread the over-dress pattern at the hem to get the fullness we want, and then cut the over-dress on the bias so that the fabric hangs softly.
It seemed so straightforward! So I slashed and spread the front pattern.

All that fullness at the center front emanating from the neck was not what I thought I’d get.
Since the under-dress had no changes to it, I sewed it in the solid blue fashion fabric. For the over-dress, I bought inexpensive chiffon for a quick mock-up to double-check that my pattern work would give us the effect we wanted. But oh my, it wasn’t what I was hoping for or envisioning!
I wanted the fullness evenly distributed across the entire front, not bunched at center front and the sides. And I wanted the fullness starting below the bust, not at the neckline. I tinkered around with how I slashed and spread the pattern, did another mock-up, but still didn’t get what I wanted.
To me, this aspect of making garments is intriguing, even if sometimes perplexing. Over the years, I’ve learned that getting frustrated sure doesn’t help me. What does help me is to approach situations like this as simply a problem to be solved. Figuring out how to get what I want is part of what fascinates me with the creative process.
When my first two attempts didn’t give me the results I wanted, I decided that I must not really understand what I wanted the fabric to do. So I bought more inexpensive chiffon, marked the length-of-grain and cross-grain in order to keep track of the grain line, stood before a dress form, and started to experiment.
Although putting the fabric on the bias at center front was logical, it didn’t give me the results I wanted. Plus, I was increasingly nervous about the tendency of bias garments to “grow,” and I didn’t like the look of the center front seam in the chiffon. I was also uneasy about having to control a bias hem in this chiffon, especially since my client wanted an uneven hemline, which meant that the hem would have all sorts of different grain lines rather than a consistent grain line.
Thinking more about hemming the chiffon led me to the idea that if used the selvage at the hem (and cut off the selvage before hemming), the consistent length-of-grain would be really easy to handle. I liked this idea!
As I started to drape with the inexpensive chiffon, I discovered that as I pulled the chiffon upwards at the center front neckline, I got both a beautiful distribution of fullness across most of the front and the arcing hemline that my client had envisioned. The unanticipated bonus was that the fullness began largely at and below the bust. And I was able to smooth the chiffon above the bust and across the shoulders. This meant that the fabric at the neck and shoulders was on an odd grain line, but everything else was exactly what I wanted. And I no longer needed a center front seam.

My first attempt at draping the front in inexpensive chiffon, having the selvage all the way across the lower edge. Now I was getting very close to what I wanted.
With growing confidence, I repeated the process for the back with yet more inexpensive chiffon for the mock-up. The back hung a little differently from the front (no bust, obviously), but I liked the effect I got with the fullness emanating from the neck.
My client came to try on her multi-colored, inexpensive chiffon trial run. It turned out to be a quick fitting with a thumbs up approval. And I moved on to the beautiful silk chiffon print.
Soon the “real” dress was ready for her to try on. She was very happy with it and especially liked the long “tails” at the sides of the dress. But we both knew that it wasn’t practical to have the tails dragging on the floor. Thinking back to how beautiful the chiffon was when we created bunching and volume, we decided to experiment with shirring the sides. We both loved the graceful effect, reminiscent of some styles from the early 1900s.
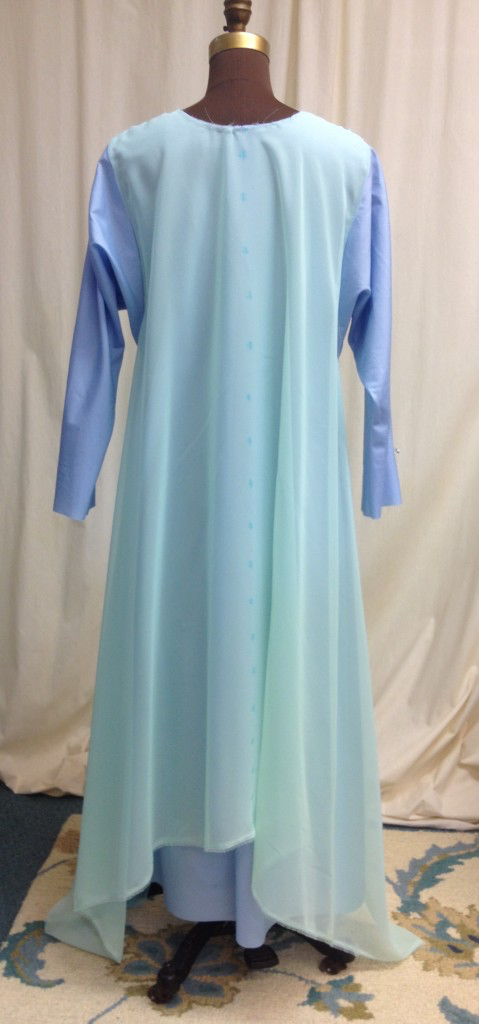
The back of the mock-up.

The long “tails” on the side of the dress.